
There are quite a few different power tools out there, ranging from small hand held ones to large industrial sized machines capable of handling heavy duty jobs.
With so many options out there, choosing the right tool for the job can be tricky. So, what makes a good choice for a woodworker?
The first thing to consider is whether you want a corded or cordless tool. While both types of tool offer advantages, they also have their downsides.
In this article, we’ll discuss the pros and cons of each type so you can decide which is better for you.
Let’s get Started!
Corded or cordless? Corded and cordless power tools are incredibly versatile and can be used for almost any job.
However, there are some differences between the two tools. Cordless tools are all the rage these days, because of their portability and convenience.
However, corded tools offer many advantages over cordless ones, including the ability to exert more form of torque, and therefore be more versatile.
If your work involves lots of cutting or drilling, then it might make sense to go with a corded option.
This way, you don’t need to worry about having an electrical outlet nearby as long as you’re using that machine.
However, if you plan on doing any kind of grinding or sanding, then a cordless model may prove more suitable.
For many people, using a corded max power tool is an essential part of their everyday lives.
Whether you are a contractor, working on a larger project in your home, or you are a professional carpenter, you will almost always need power tools for your work.
But while all power tools are not created equal, there are some that are better suited for certain tasks.
Pros:
Cons:
Cordless power tools, also known as battery-powered tools, come with several advantages.
Pros:
Cons:
Corded or cordless drills are great for DIY projects because they offer many features. All of them feature variable speeds, which make them perfect for drilling holes, cutting wood, and other similar jobs.
They all include dust collection systems, allowing users to avoid breathing in sawdust. You can find both basic models and advanced ones too.
Some power drills function combos contain multiple attachments, making them ideal for different applications.
There are many brands that offer high-quality tools, some of these are:
1. DeWalt
2. Makita
3. Black and Decker
4. Ryobi
5. Kobalt
6 Hitachi
7. Craftsman
Whether the handyperson is a professional or an amateur, all tools will need to be maintained. Handyperson maintenance is easy, with the right tools.
If you want to decide between corded and cordless tools, it’s important to consider your budget, what types of woodworking you plan to do, and how much control you want over your tools.
The best way to decide is to research the various models and figure out which one’s fit your budget.
Choosing between a hand planer and a bench planer can be quite confusing. Both essential tools offer similar features. However, there are several key differences between these two manual planer.
There are many types of planers out there. Some are designed specifically for woodworking, while others are used for general household tasks.
The type of planer you choose depends on the type of building projects you want to complete.
In this article, I will show you some of the fundamental differences between these two high-end planer, so keep on reading!
Hand planer is a durable tool with a flat rectangular laterally symmetric blade that is used to smooth and straighten rough surface planed types of wood and to prepare boards for finishing.
A hand held planer works by using a rotating cutter head that cuts material in front of it. This kind of hand powered tools allows users to make smooth rough edges with minimal effort.
A hand plane also has an adjustable fence system which enables the user to create compound blade angle with no problems.
In addition, they are lightweight when compared to other full-sized power planers. They only weigh around 14 pounds.
1. Lightweight- These planes weight less than 10 lbs.
2. Adjustable fence system- You can easily adjust your fence position according to what angle you need from your board edge. If you have multiple jobs or industrial projects going at once, then you won’t face difficulty adjusting your work space.
3. Portable- It weighs much lighter than most bench-type planers. Therefore, if you don’t own one already, you should buy one.
4. Easy to use- Their simple design makes them easy to use even for newbies who aren’t familiar with working with power tools. All you need to do is simply hold it against the board and start moving it. Most people find it easier to operate since their hands remain free during operation.
5. Easier on your hands- When sharpening blades of both your hand and bench electric planers, you might get tired after doing that task repeatedly. In contrast, hand planes require little maintenance, as all you need to do is sharpen the blade every now and again.
6. Durability- Since they comprise metal parts, they last longer than those made of plastic.
7. Versatile- Although they are primarily intended for smoothing scrap wood flat surface, they can also be used for cutting through materials like plywood, MDF, particle board, etc.
8. Safe for woodworkers- Unlike bench planers, hand planes are safe enough to be handled by woodworkers. There isn’t anything unsafe about owning such a versatile tool.
Bench top Planer is a tool that allows you to simultaneously flatten and plane wood boards.
Using a bench top planer is the best way to ensure the layers of wood are accurate; the full-sized planers flatten one side of each board to ensure that when you put them together, they will be even and level of thickness.
Bench top planers are more powerful versions of handheld planers. As opposed to handheld ones, benches planers come equipped with larger motors and heavier weights.
They can handle thicker pieces of lumber. A bench top planer comes in handy, especially if you have large amounts of material lying around.
The reason they are called “bench planers” is because they feature heavy duty mechanisms that enable them to sit on a table rather than being carried manually.
Here are some of the key benefits that make them ideal for woodworking:
Once you purchase a bench top planer, there is no need to assemble it yourself. Simply remove its cover and place it where needed. Also, some models allow you to attach accessories to make tasks faster.
Because these bulky machines are designed specifically to radius cuts thick stock into thinner layers, they provide reliable results.
They weigh less compared to other types of planning devices. This means you can carry it wherever you want with no hassle.
You may choose to buy several units depending on how many woodwork project you wish to complete.
The high durability of these portable machines ensures you can use it for years before needing to replace it.
These gadgets are cheaper than purchasing individual ideal tools.
Determining the right choice between a hand planer and a bench planer can be a hard decision to make. They used hand planers for minor jobs, while they used mainly bench planers for bigger jobs.
The bench planers are bigger and heavier than the handle planer, but both types of planers do their jobs well.
To choose between these portable tools, consider whether you will use the hand planer selection or bench planer primarily in your shop and in your woodworking projects.
Hand planers and bench planer types are both popular tool can help you shape imperfect wood. Below are some things to consider when choosing between the two.
How big is the carpentry project you intend to work on? If it is very large, then go for a bench planer since it is better suited for large-scale operations.
However, if the job at hand requires just a couple of minutes of time, then choosing a lightweight model would fit perfectly fine.
2. Weight
In most cases, smaller plans weigh less than medium-sized ones. Therefore, if weight isn’t an issue for you, opt for a lighter unit.
If you’re looking for power and speed, then get a bench planer instead. It has higher torque, which enables it to handle much larger materials than a regular handheld smooth planer.
3. Ratio
Ideally, the ratio of the manual tool needs to match the type of task you’ll be doing. For example, a handheld planer might not be suitable for cutting plywood sheets.
In such situations, look for a bench planer with a larger motor to tackle more challenging pieces.
You also need to factor in how easy it will be to move around. A portable device like a handheld planer won’t require too much effort to transport from one location to another.
However, moving a bench planer could prove laborious. Therefore, if you have limited space available in your workshop, select a handheld planer over a bench planer.
Hand planers are used to produce a flat surface with no chipping, tearing or gouging. It is used to create a flat smooth surface on a piece of wood can or other material.
You need to use a hand planer when you want to achieve a smooth, flush surface. An electric hand planer is the least powerful of the stationary planers, but it is extremely versatile.
Power hand planer are a good choice for a lot of work on soft selection of wood species or on decayed wood where a sharp edges of board are unnecessary.
It is compact and easy to use.
It's used to shape poor wood or to smooth its surface.
It is lightweight and easy to control.
It is relatively cheap.
It is used in households and by carpenters.
It is versatile.
It's used to create an aesthetically pleasing surface in preparing wood.
You can use a bench-top planer to create a smooth finish on a wide variety of materials.
When cutting boards to thickness, consider using a table planner, which is useful for maintaining the original shape of boards.
This powerful bench planer has adjustable blades that shave off a thin layer of wood, creating a smooth surface for the boards.
The bench top planer can produce a flat, smooth, and parallel surface. This machine is used in the milling process of woodworking to make a piece of chunky lumber thinner.
Specialized tools are one of the most commonly used items in any household. In the end, the most important thing is to gently and carefully cut away the area you want to work in.
Use a bench planer if you’re dealing with an enormous area, but a manual hand planer is a better choice if you’re working on a piece of furniture.
Although, if you’ve been building furniture for years, you’ve probably gotten used to using a bench quality planer.
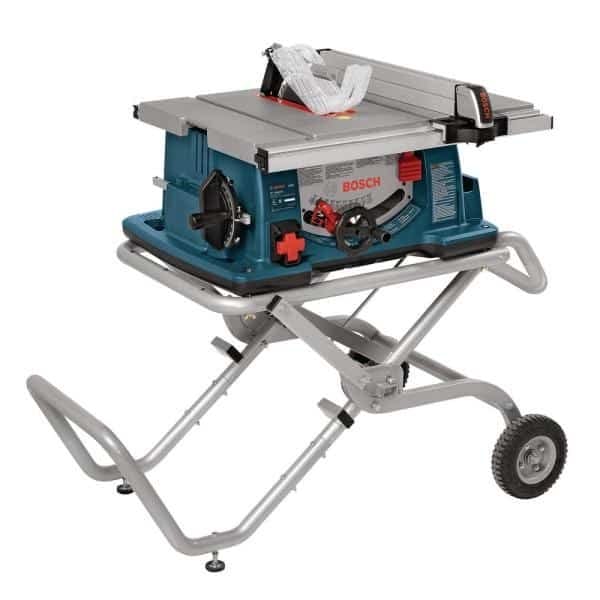
Table saws can be a little overwhelming to understand due to their various parts and accessories, but these tools should be in any woodworkers life, as they can help you cut all kinds of wood precisely and with ease.
Once you understand table saw basics, you can start to figure out what you need in the table saw and how they work, for example, a table saw consists of the basics such as mitre gauge, rip fence and blade, they additionally have two different motors and drive configurations, as well as several features and accessories that come included depending on the model you buy.
So as we can give you the low down on everything you need to know, we have composed an information-packed guide below to table saws that will leave you feeling confident and a professional when it comes to using them.
Let's get into it!
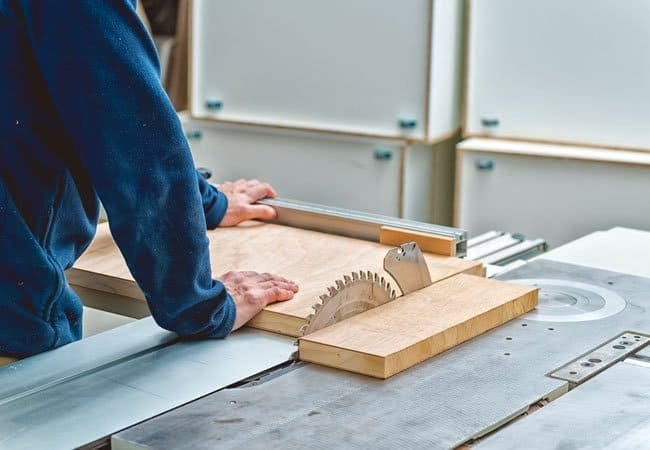
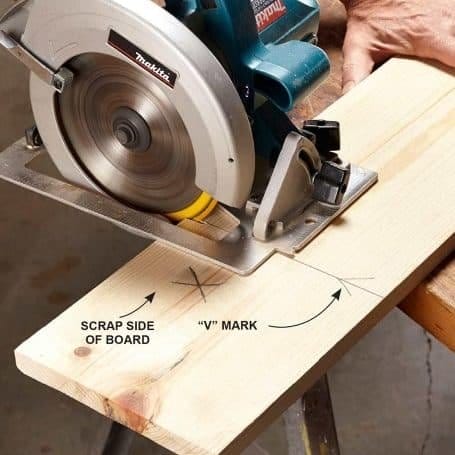
Let's start our guide by understanding what a table saw is. This power tool is used for woodworking and comes with a circular saw which is powered via a motor that sits on top of the table, you can use this protruding saw to cut the wood into different shapes and sizes according to your project.

You can also mount different accessories to your table for a variety of projects such as a crosscut sled and use an extension table for large wood pieces.
Table saws come in a few different types according to the job they are suited for, we will categorise each one into stationary and portable to make it easier to understand.
Portable table saws are very lightweight and small and can be moved around easily for different jobs, they tend to use a direct drive system and have around 15 amp power motors.
These types of table saws can be split into; jobsite, compact and benchtop.
Jobsite table saws come mounted and are most suited for construction sites as they are pretty hard-wearing but still have a lightweight, allowing you to take them from site to site.
These models are very lightweight and affordable, they come without a stand and are mostly used in homes or garages because of their small footprint. The table saw tends to be made of plastic or aluminium to keep the weight down and has quite a small rip fence capacity.

Compact table saws might have a smaller rip capacity than full-sized ones but do still come with a table and a motor most of the time, they also keep their lightweight while being higher quality than benchtop models.

Stationary table saws are used for more professional purposes and are not portable as they come full-sized with belt-drive motors and aluminium or granite tabletops.
These table saws are split into; contractor, hybrid and cabinet.
These table saws are mostly used by professionals due to their very large size, however, nowadays contractors tend to go for more portable table saws instead that can do a similar job.

Hybrid table saws are like the more modern version of a contractor saw, they hold a similar set-up except have inboard direct drive induction motors. These saws also come with an open leg or full enclosure design which makes them more like cabinet table saws too.

Lastly, we have cabinet table saws which are the most powerful type of all and can withstand heavy-duty use. They also tend to have very powerful motors and accurate fences but are not portable.

So as we can understand how table saws work, we need to strip them back to their basic parts, a table saw will consist of a fixed blade on typically a cast iron table which should be flat, you push your wood past this blade and the table saw will able to make a variety of cuts to your work such as angled or crosscuts.

We have listed out the basic anatomy of a table saw below.
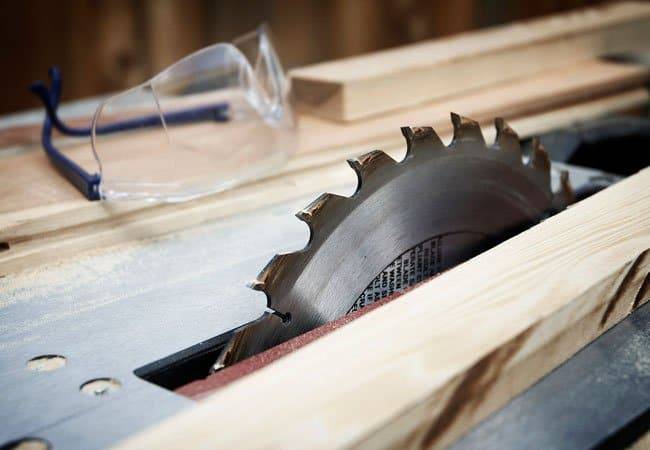
The blade of a table saw is one of the most important parts, your table saw blade will come either with carbide, carbon or diamond-tipped teeth and can cut through a variety of materials, not just wood, this blade will also vary in size according to its teeth and differs due to other factors too such as the arbor size and speed.
There are likewise different types of blades such as rip cut or cross cut blades on the market, but whatever you choose, ensure it's of high-quality.
A rip fence on your table saw acts as a cutting guide and is parallel to the blade, it also locks the material down and ensures it doesn't go anywhere as you are cutting.
You should check the rip capacity of your fence too to check if it will big enough for the type of work you will be doing, most jobsite table saws should have over 24" in size.
The last yet most important basic part of a table saw is the mitre gauge. The mitre gauge is responsible for cutting woods at angles of 45-degrees and will also have a bevel adjustment option for cutting with.
Along with the basic parts above you will also be faced with choosing two different types of motor and drive configurations for your table saw.

We have gone into some more detail about both types below.
Direct drive powered table saws use universal motors that tend to have 120V of power and are mostly found on portable table saws, these are the best for DIY use.
These motor types are very powerful and are the most desirable for professional use, the motors will operate on a 240V circuit and can come in quiet options too. You will often find this type of power on stationary table saws.
Now we understand the basic parts of a table saw and its drive systems, you should also familiarise yourself with the extra accessories and features that come with a table saw so as you can understand how the whole power tool comes together and what to look for in the best model.
What are the benefits of using a table saw?
A table saw is very beneficial as it allows for high-speed accurate cuts on your woodwork, it is also very versatile and can be used to make a variety of cuts for furniture, no matter its size.
Are there any safety tips for using a table saw?
Table saws can be a dangerous power tool if used incorrectly, you should always follow some safety tips such as; using a riving knife, applying the right amount of pressure, not wearing gloves, using safety goggles.
How many amps should a table saw be?
A good amp power for general use should be at least 15 amps, however, it could be better to go higher if your looking to use your table saw for more professional heavy-duty work.
To conclude, table saws are a great piece of woodworking equipment for everyone to use who is looking to make a variety of cuts on their work with high accuracy and speed. We always recommend looking out for the best features on your table saw such as a durable fence and accurate mitre gauge, you should always ensure that your model has enough power for the work you will be doing too.

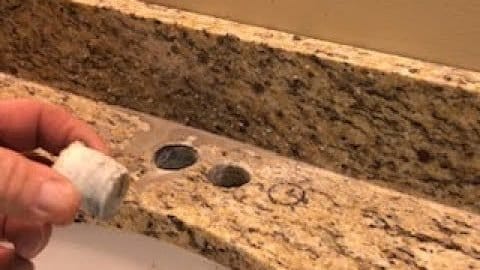
Granite is a very dense and strong material, often used on kitchen countertops due to its variety of patterns and stain-free finish.
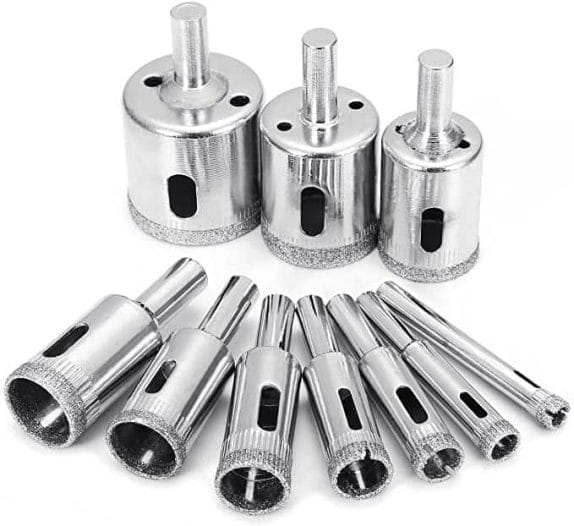
Although granite is beautiful for our homes, drilling it can be a big task due to how hard and brittle it is, also granite is often installed as a single slab, so one wrong move and you could potentially crack the whole thing.

It is very possible however to drill a hole in granite with the right tools on your hands such as a diamond drill bit, some scrap stone and wood, you should always ensure that you are using the correct equipment too and wear safety gear when attempting this task.
We have put together an extensive guide below all about drilling granite so as you can drill your countertop or granite surface properly without ruining the whole slab.
Granite is a type of rock that is very hard and wear-resistant, it comes in at 6 or 7 ratings on the Moh hardness scale too and is mainly made up of quartz and feldspar.

This material is one of the most natural forms of materials you can use in a building and is mainly used for countertops due to the fact it can't be stained or scratched.
This rock in particular is very hard to drill due to the fact it is quite brittle at the edges, meaning it will take double the time to drill in comparison to other materials.

Drilling through granite requires the right drill bit too and some other pieces of equipment to keep things safe and stable while avoiding cracking the granite.
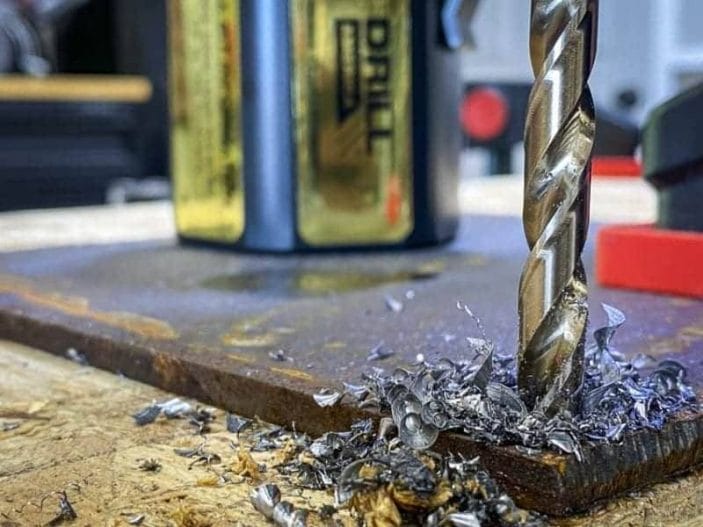
To drill through granite you will need a special diamond drill bit for the job, avoid using a masonry drill bit as this would most likely get stuck in the granite.
We have listed out some important factors to consider in your drill bit for granite below.
Now we know some more about granite and how to pick the best drill bit for the job, let's get into how to drill through granite.
You will need some specific tools and we also suggest clearing the workspace away from pets or animals during this process so as you can avoid any accidents, always wear safety equipment such as goggles too.
First off, you should figure out how big you need to drill the hole and use the appropriate sized drill bit in correspondence. Mark the drilling area with a sharpie clearly, you can also clamp some wood and mark the wood to avoid chances of cracking the granite, put a piece of scrap stone over the drilling area too and clamp all in place.

Now attach the chosen size drill bit to your drill, we recommend using a diamond core drill bit for this job as it will be able to handle the granite with ease. Ensure there are no loose attachments on the drill as well to avoid breaking the granite.

Start drilling over the marked area with steady and light pressure, you can put some lubrication on tip of the drill to reduce the temperature build-up too, this will also make the drilling easier. Never force the drill into the granite and let it gain speed gradually. Some people recommend drilling for 10 seconds on then 10 seconds off to give the drill bit a chance to cool.

If drilling multiple holes, let the bit cool down before moving on to the next one!
Stop drilling the granite until you reach the scrap stone. After you have made your hole, clean up the excess lubricant straight away so as it does not sink into the pores of the granite. You can always use water instead of lubricant just in case to avoid this.

How easy is it for granite to crack?
Granite is very heavy-duty but will crack like other durable materials when it's hit with enough pressure due to it being quite brittle. This is why you should always use the correct drill bit and go slow.
What is a diamond core drill bit?
The teeth on a diamond core drill bit feature diamonds, these diamonds are very hard and allow you to drill through materials like granite with ease, these bits are a step up from carbide tipped drill bits.
These core drill bits also act as a plug when they are being drilled into the material, so effectively draw a circle out of the granite.

How easy is it for a drill bit to overheat?
A drill bit can overheat easily when used at too high of a speed for too long on heavy-duty material. This is why you should use lubricant and take breaks when drilling. When your bit overheats this will not only ruin the bit but possibly the material too, always stop drilling if you smell any burning.
Should you use a hammer drill for drilling granite?
No, some people recommend a hammer drill for tough material, but granite is not one of them, hammer drills are too aggressive for this kind of countertop and can potentially crack the material.
Overall, drilling granite is a slow and steady process that should not be rushed, always use a diamond core drill bit and use the necessary accessories such as scrap wood and stone to avoid cracking the granite. Also, apply lubricant when dealing with a tough material like this to stop the drill bit from overheating and make sure to wear goggles and a mask to avoid breathing in the dust created.
We only recommend drilling granite if there is no alternative, as this rock is very expensive and not easy to make holes in, so if your hole is for electricity or plumbing, try to see if there is a way around it, and never drill more than 1-inch to the wall, as this can increase the chances of the granite cracking.
Happy drilling!

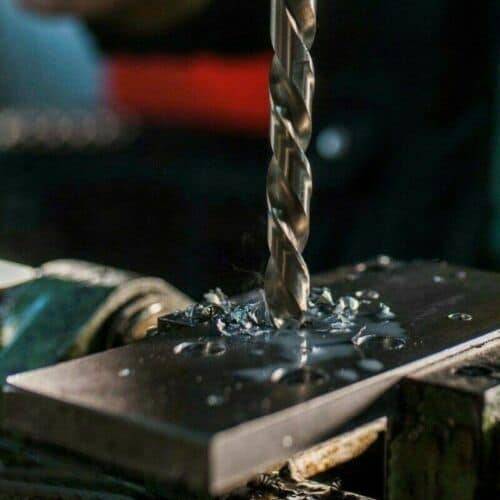
Drilling hardened steel is not an easy job, this type of metal is brittle and hard, making it difficult to drill without damaging your drill bit or the metal itself.
This doesn't mean you should quit however, drilling hardened steel can be done safely and quickly with the right equipment such as a sharp drill bit, clamp, lubrication and determination! Drills that have weak material should be avoided, as this will make your job much harder.
To find out more about how you can drill hardened steel in the best way, we have put together a short guide below that will give you all the information you need to drill through that steel!
If you are faced with the task of drilling hardened steel, then it's a good idea to learn some more about this metal so as you can be drilling it efficiently and understand its uses.
Hardened steel is carbon steel and will often be used to make heavy-duty machines and parts on tools. Hardened steel is made by heating it to very high temperatures through a process called tempering and quenching, in other words, heating and cooling, this is done several times to improve the strength of the steel yet make it less brittle.

You can also find case hardened steel which is even tougher than typical hardened steel and used to make drill bits or car parts.
Hardened steel has advantages over other metal types as it doesn't rust easily and is very durable, however, due to the molecules being so close together after the hardening process, this makes it very hard to drill through, it also has a fairly low melting point due to the hardening process it has gone through.
Choosing the right drill bit for drilling hardened steel will determine whether you can finish the job or not, if you use the wrong drill bit on hardened steel you could potentially risk it snapping due to the toughness of the metal and the heat.

We have listed out some typical features to watch out for below in a drill bit if you want to drill hardened steel with ease.

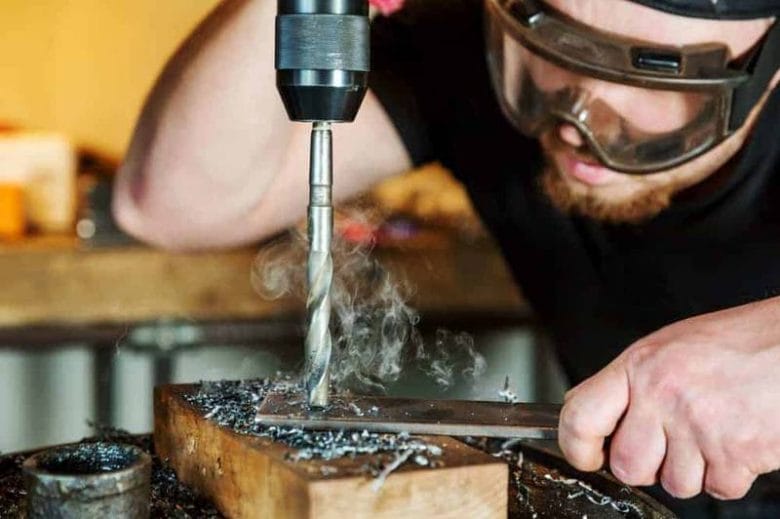
Now we know what hardened steel is and how to choose the best drill bit for this job, let's get on to how to do it quickly and efficiently. You should always ensure you have your selected drill bit and metal with you beforehand, keep the workspace clear and wear appropriate safety equipment as you will be dealing with very brittle metal.
One of the first steps you need to take before drilling is clamping your chosen piece of metal down, this will ensure that everything stays tight and secure during the drilling process, improving accuracy and reducing the chance of injury.
Also, pick the right drill bit for the hole you are going to make, always make sure that it is half of the diameter of the hole that you are looking to drill.

One of the best ways to keep the temperature down and protect your drill bit when drilling is by lubricating the drill bit itself with some cutting fluid or oil, you could use water too as this reduces the friction between the hardened steel and the bit.

Use a pencil or a marker to draw and measure where you will want your hole to be so you can see exactly where you need to be drilling, ensure the hole is of the right diameter too.
Now everything is prepared and marked, you can start drilling your steel. Always ensure you are holding the drill perpendicular to the hole and maintain a steady pressure at a low speed when working with this type of metal. Keeping a low speed will also help the drill bit to keep a low temperature, make pauses while drilling too.

After making the hole in your hardened steel you can now take away the lubricant with a cloth once the steel has cooled and use a rasp to sand off any sharp pieces of metal if you wish.
As hardened steel is not easy to drill through due to its tough composition, you should ensure that you are protected with the correct safety equipment throughout the drilling process to avoid any accidents from happening.

We have listed out the best safety tips below to use if you are going to be drilling hardened steel.
What is a masonry drill bit?
This drill bit is also known as a carbide-tipped bit and can be used to drill materials such as bricks, stones or other brittle and hard materials like hardened steel, making it very suitable for heavy-duty drilling.
How can you tell if a metal is hardened?
You can check the hardness of your metal with a Rockwell testing machine, this machine will push a piece of a conical diamond tip or rounded steel ball into the metal then measure the depth of the indent to indicate hardness.
What is a drill press?
A drill press is pretty much a drill but placed on a fixed stand, this stand has extras such as a clamp and is best used when dealing with tougher materials such as hardened steel as it improves accuracy and makes it safer.

Overall, drilling hardened steel will only become difficult if you have the wrong tools, as long as you ensure you have the right drill bit on hand that can tackle this tough metal, you will find the drilling a simple and quick process. Continuously wear safety equipment when drilling hardened steel and make sure to work at low speeds to improve accuracy too.
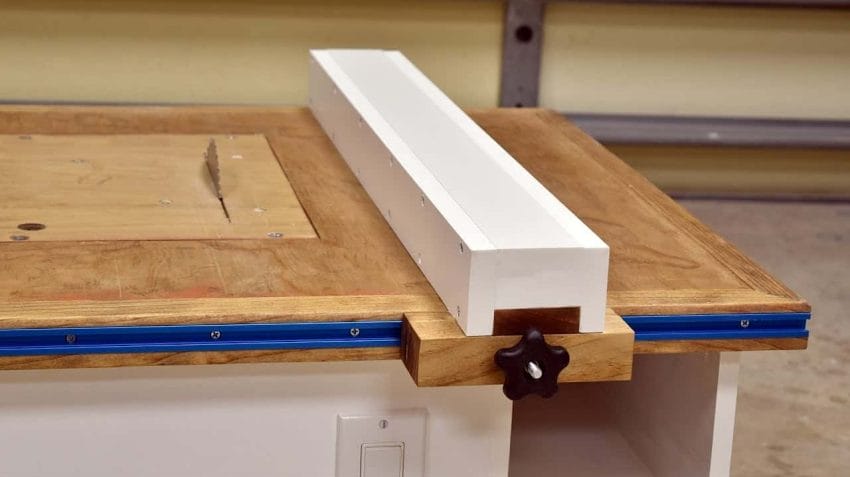
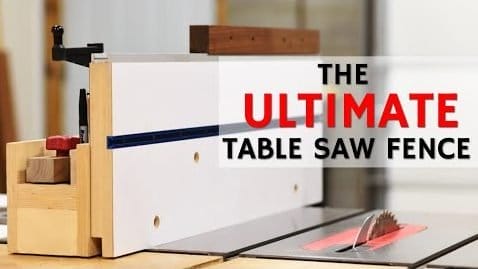
The table saw fence is one of the most underrated parts of a table saw, without a good fence, your cutting would be all over the place as there would be no guide for your work.
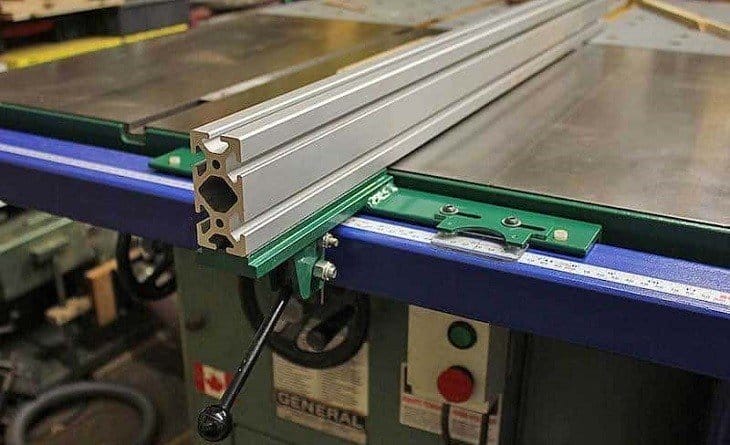
Sometimes, table saws do come with a fence included, however, most of the time this fence isn't durable enough, meaning you might want to make your own or buy a more professional one. Luckily, it is pretty easy to make your table saw fence with a few pieces of equipment such as some aluminium and plywood.
To help you figure out how to make your rip fence and use it, we have a short step by step guide that will guide you through the process.
So without further ado, let's get making that rip fence!
The table saw fence as we mentioned above is one of the most important parts of your table saw. This fence acts as a guide for your wood when you make a rip cut and is most commonly used with table saws or circular saws.

When ripping wood with a table saw, long pieces of wood are often used, so the fence which runs parallel to the blade offers additional stability too and holds it in place for accurate cutting.
A rip fence not only ensures that your safe by guiding the wood for you but ripping the wood would be impossible without it too, as the fence is what provides stability. Kickbacks are also more likely to occur without a table saw fence as the grain of the wood may be cut at the wrong angle which a fence would prevent, this could seriously damage the user.

We have listed out some further benefits of table saw fences below.
Making your own table saw fence is a great way to ensure it is parallel, accurate and most importantly, durable. You should always make sure that your fence is perpendicular to the saw, secure and not flexible, as there will be a lot of pressure when the material is placed in between the fence.
There are a couple of ways to make a DIY table fence, but we are going to go with a method that will make your fence the most professional.
We have listed out the basic tools and steps you will need to make your rip fence below.
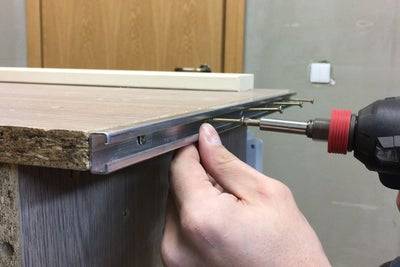
One of the first steps to making your fence is by constructing the aluminium. Drill 5 holes in your piece of aluminium for screws and put a 9mm groove in the middle by making two passes with a saw for the sliding bolts.

After constructing the aluminium you can install the rail. Look at where the rail needs to be on the tabletop edge with the wooden board, mark the holes too at this stage and predrill some holes for later, you can use your 50mm screws to secure the whole thing.
Now we have constructed the aluminium & installed the rail we can get on to putting in the sliding mechanism and assembling it all. First, take two of your square wood pieces and drill three even holes through them, then take another square wood piece and drill again but leave the centre hole only half drilled.

Put two T nuts in the side holes of this wood with a hammer and use a chisel to take off the excess wood at the back, glue and screw both pieces of wood together.
Grab your carriage bolts as you will be using them as sliders and the centre one for stability, you may have to grind the two bolts on either side however to make them fit the rail.

Ensure you have your 2x7cm wood board and make sure it fits the dimensions of your table, you can glue on some plywood for more stability too. Align your fence to the blade on your table saw and screw it into place with some glue too for extra durability, this fence is also removable in case you wanted to use your saw for crosscuts.
Allow everything to dry then give it a test!
Even if you have decided to make your table saw fence, it's a good idea to make sure you familiarise yourself with the best features you need to be looking for in one so as you can ensure yours meets professional standards.
Or in case you would rather buy one, we have listed out the essential features you need to be looking for in the best table saw fence below.
If you are after a more high-quality rip fence for professional work, they will benefit you with extra durability and accuracy than when compared to a homemade DIY fence, however, they can put you back about £200-£250 if you get a very high-quality one.

You should go for a professional rip fence if you do heavy-duty ripping often and need your cuts to be of high accuracy.
What's the difference between a mitre gauge and a rip fence?
Rip fences are only good for rip cutting, mitre gauges on the other hand can be used for different types of cuts such as squares or angles, a table saw typically comes with both a rip fence and a mitre gauge.
Are rip fences only for a table saw?
No, rip fences can be used with circular saws too so as they can be utilised as a cutting guide for better accuracy.
Why is it important to have a table saw fence?
Table saw fences provide stability and accuracy to your woodwork, they also help with safety by reducing the chances of a kickback happening from the saw, you should never operate a table saw without a fence as cutting the wood at the wrong angle against the grain could be very dangerous.
To conclude, making your table saw fence can be done in a variety of ways, whether you use aluminium or plywood, just ensure you measure your fence first according to your table saw and make it as durable as possible. If you're looking at buying a more professional fence in the future, always check it has the right capacity, it's made of high-quality material and is easy to adjust.

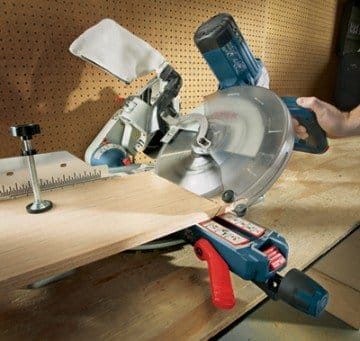
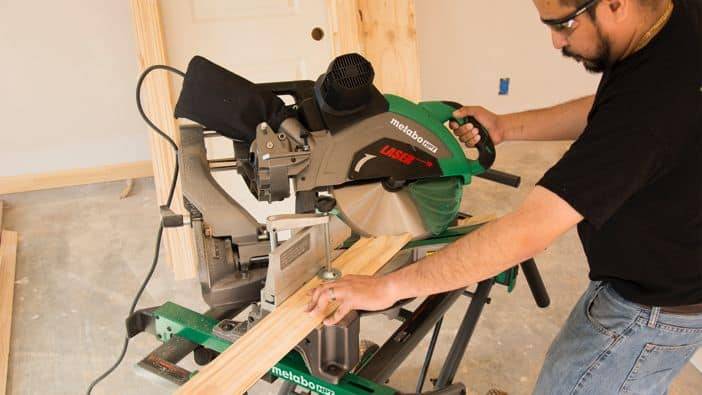
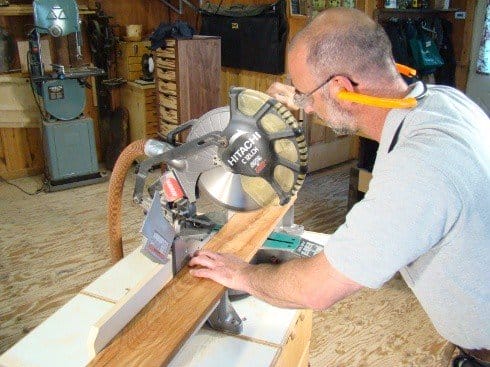
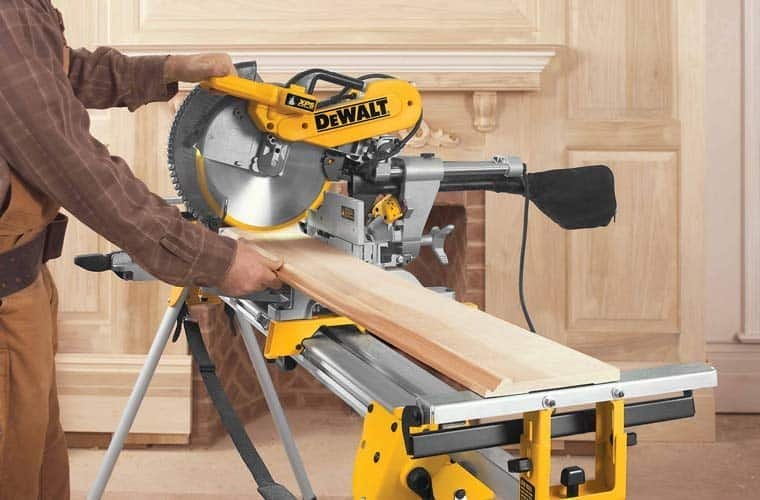
If you after the best-angled cuts or mitre cuts on your woodwork, then a compound mitre saw is the best tool out there for you, and we are going to tell you exactly how to use it in the best way possible for the top woodworking results.

A compound mitre saw is pretty simple to function when you understand the parts and how they operate, all you need to do is place your wood against the fence of your mitre saw and set the angle/bevel then begin cutting, however, there are some tips and tricks which can help make this process easier.
So to help you understand more about compound mitre saws, how they work and how to use one, we have put together our best guide below which will give you everything you need to know about these compound mitre saws so as you can be woodworking professional.
A compound mitre saw is a versatile woodworking tool that allows you to make a variety of cuts in your work such as; cross cuts, square cuts, bevel and compound cuts.
This saw can pivot vertically and rotate horizontally for different angled cuts which tend to be either 45-degrees right or left. Most compound mitre saws additionally come with hard stop pre-set angles in between.

So as we can understand how to use one of these saws later on in our guide, let's briefly go over the main parts of a compound mitre saw so as we can see exactly how they function.

When looking into using a compound mitre saw, there are also two other types available on the market; a dual compound mitre saw and a sliding compound mitre saw.

We have gone into some more detail about these two variations below.
A dual compound mitre saw will allow you to cut your wood left or right without having to flip the board over, this is preferred by professionals as it saves you time and is beneficial when doing decorative woodwork, single bevel compound mitre saws only let you cut in one direction.
Sliding compound mitre saws let you move the blade back and forth, allowing you to cut variable board sizes, making them great if you plan to be using your saw for larger and smaller woodwork sizes.
Believe it or not, although mitre saws are great, they might not be needed by every single woodworker. Compound mitre saws tend to be suited to people who make angled cuts often in work such as when making picture frames, crown mouldings or boxes. They may also be used professionally on construction sites where materials need to be specifically angled such as roofing.

We have listed out some other benefits below as to why you should use a compound mitre saw -
Now we know what a compound mitre saw is, its essential parts and why you should use one, we have put a basic step by step guide below which will teach you how to use one of these machines efficiently as a beginner.
Before you can start to use your compound mitre saw properly you should make sure it has enough power and size for the job, your blade size should be big enough for the width of what you are about to cut and the machine should have enough amps of power for the work required, for a more powerful job, use a more powerful compound mitre saw.
If your compound mitre is the right size you can begin by switching it on and adjusting the base of the saw and head according to the angle or bevel that you want to cut. Don't press the trigger handle power until you are ready to cut the material.
Always mark where you want to cut on your wood with a pencil, remove the blade guard on your machine and lower it so as the teeth are exactly where you have marked for the cut, make sure it is against the fence on your machine.
Keep your hands away from the blade after setting it up.
Now you have turned your saw on, let it cut the wood as it reaches its highest speed itself, for repeating long cuts use an adjustable stop and for shorter ones use a line on the guide. Never lift the blade once it has stopped until it stops turning.
A compound mitre saw is pretty easy to use once you get the hang of it but you should always remember to keep large pieces of stock supported with blocks and keep shorter pieces of wood clamped. Experiment with different angles and bevels so as you can get an idea of what fits.
Compound mitre saws are one of the safest woodworking tools on the market, but this doesn't mean you shouldn't take any precautions in case of an accident, you should also remember you are working with a powerful machine that has a fast powered saw, so it's better to be safe than sorry!
We have listed out some essential safety tips to consider below when working with your compound mitre saw.
Can a compound mitre saw help me cut a square?
Yes, compound mitre saws can help you cut a variety of angles including squares and acute angles.
How many amps should my compound mitre saw be?
A good compound saw should have anywhere between 12 amps and 15 amps of power, go for more power if you plan on doing more heavy-duty projects.
What is the difference between a compound mitre saw and a normal mitre saw?
A normal mitre saw can only make mitre cuts while a compound mitre saw can make compound and bevel cuts as well as crosscuts/mitre cuts, making it more versatile.
To conclude, using a compound mitre saw is simple and just needs practice, it's always a good idea to mark the angles you want and get used to the parts on the machine before trying it out, always follow safety precautions too and keep your hands away from the blade of the machine during use!
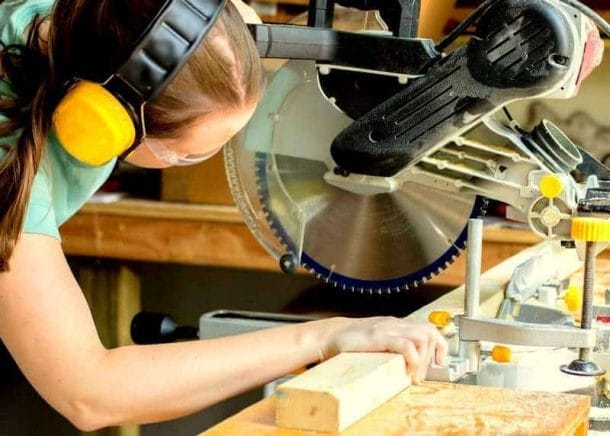
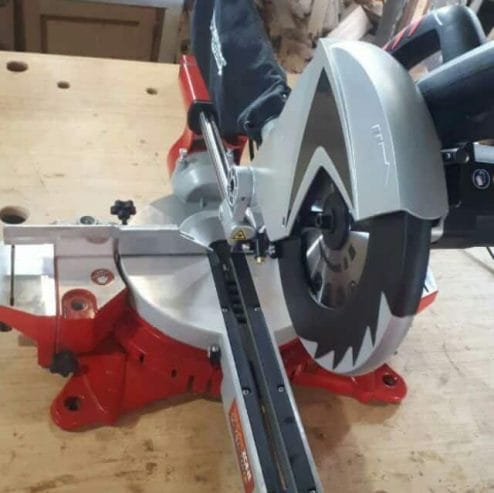
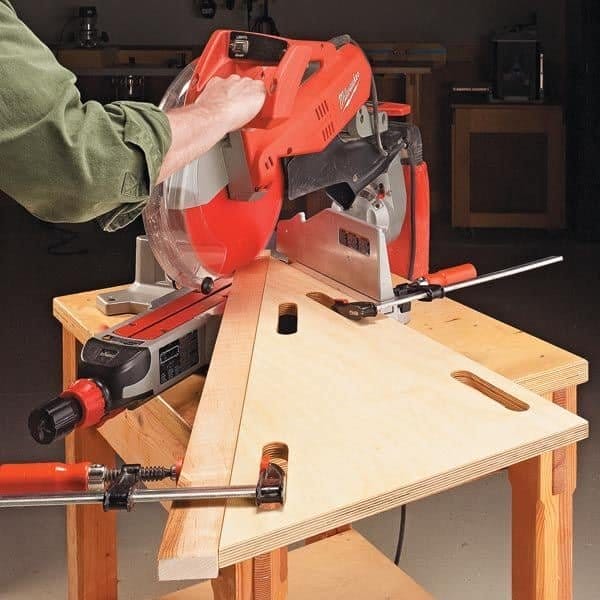
Mitre saws are a godsend for most woodworkers, they allow us to cut precise angles with ease and come in many shapes and sizes. The larger the blade that comes with your mitre saw, then the wider the piece of the material you can cut.
Except for sliding mitre saws, these types of power tools work the same as a standard mitre saw, except have a sliding arm that enables you to move the blade up and down, allowing you to cut even wider than your blade allows.

Functioning sliding mitre saws are easy too once you know how the different parts work and how to use them properly such as the fence, you should also use your sliding mitre saw safely by wearing the correct equipment and keeping the blade down till it stops rotating.
So as we can explain in greater depth how these sliding mitre saws work and the safest way to use them, we have put together our top tips and tricks below in a guide to help you out.
A sliding mitre saw is a powerful tool that can make accurate crosscuts or mitre cuts at specific angles for your woodwork. The sliding arm of these mitre saws allows you to move the blade back and forth, helping you cut large materials with ease and removing the restriction of a normal mitre saw.
If you have a sliding compound mitre saw this will additionally allow you to make bevel cuts as well as mitre cuts, it will also have guide rails for the sliding mechanism.

You might be wondering if you need a sliding mitre saw and what uses it comes with it for your woodwork, we have listed a few common uses for a sliding mitre saw below.

When deciding to buy a mitre saw, you have probably looked into buying either a regular mitre saw or a sliding mitre saw, so to make the pros and cons of each model clearer, we have compared the two types of mitre saws below.
A regular mitre saw can do the same function as a sliding mitre saw except it comes with no rails included. This type of mitre saw tends to be the best for making picture frames as it cuts at a 45-degree angle.
It is also suitable for the majority of wood pieces as it cuts up to 6-inches in four different ways; cross-cut, angle cut, bevel cut and compound cut. Its no rails also allow you to make arcs in your woodwork and cut very accurate angles/45-degree joints.
Drawbacks of these regular mitre saws are that they can't cut large pieces of wood, have a small reach and don't vary from 45-degree angles.
Sliding mitre saws function the same as a regular mitre saw except they have the option of being able to move the blade for longer pieces of wood, this also means you don't have to flip the wood, saving you time.
The drawbacks of sliding mitre saws are that they tend to be heavier due to the addition of the sliding mechanism, they are further a little more expensive than regular mitre saws.
Overall, which type of mitre saw you pick comes down to the work you are doing, if you like to make small frames and joints, stick with a regular mitre saw, however, if you want to have the ability to make large cuts, it's better to go with the more versatile sliding mitre saw.
Operating a sliding mitre saw is easy once you get the hang of it, we have listed some simple steps below to show how to use your sliding mitre saw for the first time as a beginner.

Sliding mitre saws have very sharp blades and are not to be used in an incorrect rushed way. You should always follow the best safety guidelines when using a power tool like this to avoid any accidents.
We have listed out our essential safety tips below.
What is crown moulding?
Crown moulding is the trim between a roof and a ceiling, this is often cut on a mitre saw as it needs specific angles to make each end of the joint fit.
Is there a difference between a compound mitre saw and a normal mitre saw?
Yes, a compound mitre saw will have the ability to make bevel cuts as well as mitre cuts, a normal mitre saw can't do this, instead, a regular model will be limited to its 45-degree angle cuts and crosscuts.
How much does a sliding mitre saw cost?
On average in the UK, a sliding mitre saw will normally start at £100 and above for a high-quality model.
Overall, using a sliding mitre saw is not too difficult, just ensure you familiarise yourself with all the parts and how they work before using your machine, wear safety gear too and practice on some test boards if it's your first time.
Always follow our safety tips and tricks above so as you can avoid injury or accidents while operating the saw too.

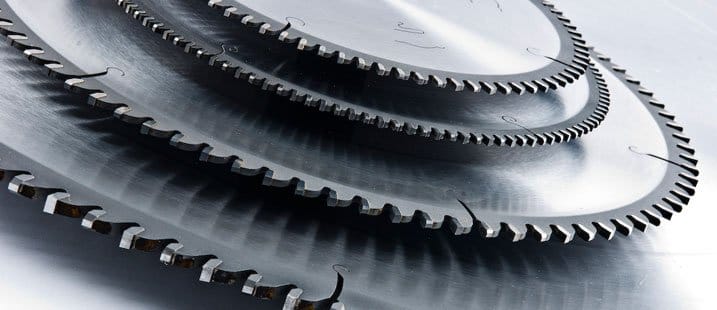
The type of blade you use will directly affect the results you get. For this reason, it’s important to know all you can about the table saw blade you choose. A key aspect of this will be the width of said blade.
Depending on the kind of work you’re doing, thicker or thinner table saw blades might be better suited to the task. Luckily for you, table saw blades come in a variety of thicknesses so you can select a blade that will do the job perfectly!
Before we get into the thick of it, there’s one bit of jargon you need to be aware of, and that is the word kerf.
What Does “Kerf” Mean in Woodworking?
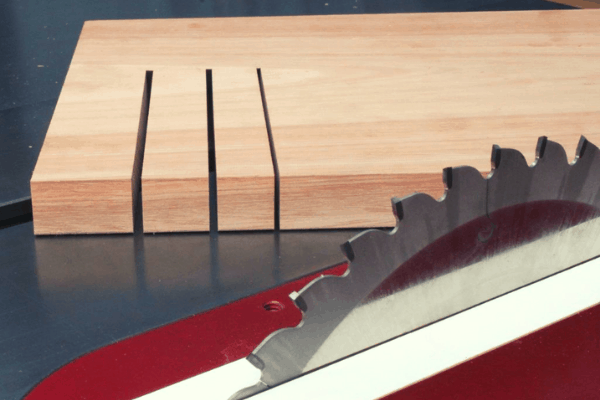
Simply put, kerf refers to the thickness of the cut made. Another way of looking at it is the thickness of material removed by the blade when making the cut. Kerf can also be used to describe the thickness of the blade itself, and kerf width is often found written on blade packaging.
Kerf is generally measured in millimetres (mm) or in increments of inches (ins/ “ ). Majority of table saw blades lie between the 1/8” and 1/4“ (or approximately 3-6mm) although you can also buy other thicknesses for more specialised work.
Why Does Kerf Matter?
There are several reasons why it’s important to know the kerf width of the blade you’re using which are outlined here.
As briefly stated above, kerf determines how much material is removed by the blade, so if you want to lose minimal wood in the sawing process then having a thinner blade (and subsequently smaller kerf) will be the way to go. Although this is more of a cumulative problem rather than an immediate one, over time, a lot of expensive wood can be lost to sawdust if too thick of a blade is used.
(image of pile of sawdust or a close-up of some sawdust)

Alternatively, if you want to make cuts of a certain width, then knowing the kerf width of your table saw blade will help you to make the right size cut. For example, if you need a cut of 0.5cm width and you have a blade of 2.5mm kerf width, you’ll need to make two cuts exactly next to each other so that together, they create a larger, 5mm cut.
All in all, keeping close attention to the kerf width of the table saw blade you’re using will help you to cut with the finest precision possible.
Different Thicknesses for Different Jobs
As we touched on in the beginning of this post, the thickness of your table saw blade will determine what kinds of tasks you’re able to do with it (to an extent). Thinner blades provide optimal accuracy and precision whilst thicker blades are better for processing harder woods in jobs where laser precision is not necessarily required.
If you’re working with expensive, exotic, or rare woods, then you’ll want to be maximising every millimetre of it. Using a table saw blade that’s as thin as possible will be the ideal choice for work like this as it will provide the most economical solution to wood waste.

If you’re going to be working on a project that will require a table saw with a higher horsepower motor (eg 3hp), then you’re going to need a bit of a thicker blade. This is because a more powerful motor will obviously apply more force to the blade and will therefore be better suited to a hardier, sturdier blade. Using a thin blade with a high horsepower motor will oftentimes cause the blade to bend which can damage the wood you’re cutting as well as the table saw itself.
All table saw blade thicknesses will allow you to accomplish the same kinds of cuts which you can learn a bit more about here, however the quality and scale of these cuts will differ from thickness to thickness. The ideal situation would be to have a collection of table saw blades of different widths so that you can chop and change depending on what result you’re looking to achieve.
Other Considerations to Make Alongside Blade Thickness
How thick your blade is will not be the only factor that determines the quality of your finished results. There are several other considerations and precautions that can help you to further elevate your woodworking:

Before you start any project involving your table saw, it is vital that you consider these factors to ensure you’re setting yourself up for the greatest chance of success!
Pros and Cons for Different Blade Thicknesses
As we’ve already seen above, the right blade for each job will be determined by the job itself. With that in mind, here’s a round-up of some general pros and cons for different blade thicknesses:
Thin Blade Pros
Thin Blade Cons
Thick Blade Pros
Thick Blade Cons
In terms of price, both thick and thin table saw blades will come in different models and specifications which means that the prices of both will vary greatly. The quality of your results will also depend on the other components of the table saw so it’s important to buy a high quality model.
(image of a full table saw)
In Conclusion
We now know what the word “kerf” means and how it relates to blade thickness, and we’ve looked at a variety of different job types that suit each blade thickness. While a lot of table saws will come with a particular type of blade as standard, there is a large range of blade options out there with different thicknesses, teeth types, and diameters which are all important factors to consider.
You’ve also seen a condensed pros and cons list for each blade thickness which should help you to decide what kind of blade you need to buy for your work. Both thick and thin blades are capable of putting out beautiful results so as long as the blade matches the job, you’re in the clear!
Whether you’re taking on a DIY furniture project or embarking on a different kind of woodworking journey, squared lumber will be quite a common requirement. But can it be done using only a table saw?
There could be a million reasons why you don’t have a workshop full of every kind of saw and tool under the sun.
Maybe you’re a novice just starting out with DIY, or maybe carpentry is a long-neglected hobby you’ve recently come back to in light of national coronavirus lockdowns. Maybe you’re an experienced woodworker already but you do a lot of your work on site rather than at home.

Whatever the reason, having a limited arsenal of saws is no reason to shy away from seemingly difficult tasks. A table saw might not seem like the optimal tool for squaring lumber but at the end of the day, if it can be done then why not?
It is indeed possible, and this post will show you how to go about it!
Why Do You Need Squared Lumber in the First Place?
Unless you’re making a very ~ rustic ~ coffee table where you’ll be using very raw (and therefore rough) wood, odds are you’ll need to square up your lumber before starting your project in order to get a neat and polished finish, as well as furniture that is secure and reliable.
Using rough wood for carpentry projects can come with a range of challenges and disadvantages including:

Generally speaking, squared lumber is a better all-rounder and will make your life much easier. It is possible to buy lumber already squared, but if that’s out of budget or availability is low then you can square rough lumber yourself using your table saw without too much hassle.
Using Your Table Saw to Square Lumber
Now that we’ve accepted that squared lumber is oftentimes the superior choice for woodworking projects, we can start going through the process for using a table saw to help us achieve a squared finish.
Before you begin, make sure you’re observing the necessary health and safety guidelines associated with using a table saw. These include wearing protective gear such as gloves and safety goggles, as well as working in a well-ventilated area. Abiding by these few simple suggestions will greatly minimise the risk of accidents happening. Once you’ve done that, here’s what you need to do:
(image of gloves and protective eyewear)

Steps for Squaring Lumber with a Table Saw

This should leave you with a perfectly squared bit of lumber, ready to be put to work in a carpentry project of your choosing.
Some Examples of Things You Can Build with Squared Lumber
The list of things you can go on to build once you’ve squared your wood is basically endless but here are some common items that you’ll be able to make relatively easily.

What you’re able to make will obviously depend on the type, thickness, quantity and length of squared wood you have, but once you know the basics of using a table saw to square lumber, you’ll be able to square different dimensions of wood.
Alternatives for Squaring Lumber
Although using a table saw to square lumber works perfectly well, this isn’t necessarily the preferred tool for the job. Most of the time, squaring lumber is done using the following:
Jointer
Planer
Bandsaw
Hand Plane and Hand Saw
On a Balance
Even without a full range of carpentry power tools, you’ll still be able to make beautiful and functional furniture using your table saw. Table saws are perfectly capable of squaring and planning lumber, and with a little practice, the process will feel like second nature to you!
It’s important to understand all the different functions your table saw can offer as this will save you running out to buy more tools every time a different project crops up. If you want to save the headache and some money, get to fully know your table saw and make it work for you!
You’ve also seen the importance of squaring wood in the first place so the next time you see a chunk of wood whilst on a walk and think to yourself “could I make a killer coffee table out of that?” consider the practicalities of working with rough wood and instead ask yourself “can I square that with my table saw?”
If the answer is no, maybe leave the wood alone.